You are capable of participating in your first match right now (well, almost). While I don’t outright recommend you show up with never having touched your gun, it really isn’t something you need to build a skill level prior to enjoy. On the contrary, I think competition shooting is an excellent way for someone to reliably build their practical shooting abilities! This article is going to focus specifically on getting started with USPSA, as it is the most widely available league for entry level shooters to join. Steel Challenge is right there with it, but is a stand-in-place type league, rather than moving and shooting. One thing to note is your USPSA membership counts for both and you classify under one member #ID!
We just started our 2025 launch roster! If you are interested in shooting for the team please, check out the info provided and reach out directly!
FIREARM : Anything you might already own in 9mm+
MAGAZINES: 3 Minimum (Depending on Capacity)
BELT : Ideally an Inner/Outer System
HOLSTER : Most OWB Holsters (See Rulebook)
SAFETY : Cheap Eye & Ear Protection
First off, what is the United States Practical Shooting Association (USPSA)? It’s the U.S. regional body of the International Pistol Shooting Confederation (IPSC). That means they follow broad international guidelines, but still manage the league independently to some extent. USPSA mainly focuses on handgun-caliber matches—about 95% of competitors use pistols, while the rest shoot Pistol Caliber Carbines (PCC).
For this article, we’ll stick to the handgun divisions. PCC is relatively easy to get into, but tough to master once you understand how the league works. None of the suggestions here are absolute, and I highly recommend doing some extra research or window shopping. Still, I get that some people just want a clear direction that’s proven to work! This is definitely one of those “buy once, cry once” situations. If you can swing the cost for nicer gear, it’s often worth it.
When deciding on a firearm, it’s important to consider the division you’ll be shooting in. The most accessible out-of-the-box option for most people is likely the Production class. This is because of its relatively few restrictions and the lack of an optic requirement, which means you may already own a gun that qualifies. That said, I still recommend novice shooters start with Carry Optics if possible. It’s the most popular division, and is often considered the most competitive. It allows the use of an optic, but still restricts many gun modifications (like compensators, flared magwells, gas pedals, etc.). Also, using a dot makes it easier to spot and correct poor grip and trigger habits, which is a big advantage when you’re also trying to learn how to move through a course.
There are tons of firearm brands to choose from, but a few staples show up at every match. If all you have is your home defense or carry gun to start with, that’s totally fine, just be aware of its limitations, especially when it comes to magazine capacity. And don’t forget: you must shoot a cartridge of 9mm or higher to participate in USPSA! (See more on Power Factor below.)
If you decide to shoot in one of the optic divisions, the question is: which optic should you choose? There are lots of options out there. I’d recommend steering clear of the absolute budget-tier choices, but spending $700 on a red dot won’t automatically make you a better shooter than someone using a $300 model. Personally, I like the Holosun 507 Comp, but I see no problem going with a Vortex as an alternative. The Trijicon SROs are undoubtedly great, but for a new shooter, that extra money might be better spent on ammo. When I built out my second rig this year, I bought another 507 Comp, this time with a green dot. I’m a big fan of the large window, clear glass, bright emitter, and reticle options (mine being the small circle with an open top, about the size of a standard dot).
The final piece of the gun build puzzle is your magazines. Depending on your division, magazine limits are based on either length or round count. Most divisions are governed by magazine length, except for Production (15-round limit), Limited 10, and Revolver (6 or 8 rounds, depending on power factor). In length-restricted divisions, it’s common to use magazine extensions or competition-specific magazines to pack in as many rounds as possible. My P320 X5 magazines top out at 21+1, while my Glock mags with Taran Tactical base pads reach 23+1. Lastly, don’t compete with cheap magazines. It’s not worth dealing with poor tolerances or low-grade polymer that can’t handle being dropped or used heavily. Nothing kills momentum like a failure to feed during a good run.
Common Firearms: Glock 17/19/47, Walther PDP, Beretta M9, Sig P226, 1911 (Colt is a Classic but not the only option), CZ P10F, H&K VP9, Sig Sauer P365 X MACRO, or whatever you have!
Competition Specific Firearms: Glock 17/34/47, CZ Shadow 2, Canik RIVAL, Walther PDP PRO-X, Staccato XL, Laugo Arms Alien
Recommended Optics: Holosun 507 Competition, Vortex Defender XL, Trijicon SRO
Recommended Magazine Accessories: Taran Tactical Accessories, Henning Group Accessories, Ben Stoeger Pro Shop
Your belt setup matters just as much as the gun you’re shooting. Having low-quality gear will lead to an equally frustrating experience. If building your kit piece by piece feels overwhelming, consider starting with a Black Scorpion Gear all-in-one package. That was my first belt rig, and I’ve since bought a second, bringing me to a total of four of their competition-style holsters, including the two that came with the kits. For those who may have received an earlier model (like my first rig), it’s worth noting that they’ve greatly improved the retention systems—both for the holsters, which now use knob-based adjustments, and for the mag pouches.
As you get more involved in the sport, you’ll start to see some of the more competition-specific brands pop up regularly, such as Double Alpha Academy, Safariland, Ghost International, and CR Speed.
The belt setup itself is pretty straightforward. Most people opt for an inner/outer belt combo, and there are plenty of options in terms of thickness and rigidity. Personally, I prefer a semi-stiff inner belt—I find it helps keep my outer belt stable. Outer belts can have different latching styles, from basic overlay-and-loop designs to ratcheting systems that allow for precise fitment.
When it comes to your holster, the two most important factors are the quality of the mounting system, and the retention. Popular competition rigs often feature an adjustable hanger, while more basic models will come with a fixed drop hanger and adjustable cant (forward/backward). Your holster must be able to retain your firearm during sudden movement or impact. If your firearm falls out of the holster (whether it’s loaded or unloaded), you’ll be immediately disqualified under rule 10.5.9. This is a common safety standard across most ranges, regardless of league rules. Your safety, and the safety of everyone around you, should always be the top priority.
Your mag pouches will vary depending on your division. If you’re shooting a double-stack gun, get double-stack pouches; if you’re shooting single-stack, get single-stack. Some manufacturers claim modularity with insert options, but make sure to check for solid reviews before you buy. Also, avoid using double mag pouches if you can. If that’s all you have to get started, it’s fine, but definitely consider spending the $20–$30 per pouch for competition-specific gear that allows you to rigidly mount each mag at the angle you want.
All-In-One Kit: Ben Stoeger Pro Shop Kits, Black Skorpion Gear Kit, Ghost Holster Kit
Recommended Belts: Double Alpha Academy, Kore Essentials, Ben Stoeger Pro Shop
Recommended Holsters: Safariland, Dara Holsters, Double Alpha Academy,
Mag Pouches: Double Alpha Academy, CR Speed, Black Skorpion Gear
Your eye and ear protection truly define your quality of life during a match. You can spend $10, but you’re going to get a $10 experience. Meanwhile, you’re likely shooting way more than that in ammo. If you’re just trying the sport out, you don’t need the best setup, but having at least active hearing protection (electronically amplified hearing that compresses gunshots) is essential. It allows you to hear instructions from Range Safety Officers and communicate clearly on the range.
I hesitantly recommend the $45 Walker Slims. They’re affordable and functional, but I’ve somehow gone through three pairs already. Still, they’re the only ones in that price range I’ve used enough to suggest. I didn’t fully appreciate the value of high-quality electronic earbuds until I started shooting rifles, but in the long run, in-ear protection is the way to go. I don’t know anyone who doesn’t complain about head pain after a 6-hour match with over-ear muffs. After my experience with Walkers, I gave the GloryFire Bluetooth shooting buds a try—and now I use them daily at work too. They let me to indoctrinate myself on Ben Stoeger and still hear my surroundings.
As for eye protection, this doesn’t need to be fancy, but it does need to work. The key things to look for are comfort, clarity, and, most importantly, complete coverage. The lenses should make full contact around your eyes. While serious injuries from ricochets are rare, spall (tiny fragments from steel targets) is extremely common. Don’t underestimate how fast a chunk of steel hit by someone’s “Bubba loads” can fly your way.
There are certainly designer brands out there that some shooters swear by, but it’s usually not necessary to spend a lot unless you need prescription lenses or extras like a first-person view (FPV) camera. If you’re interested in recording your matches through your eyewear, check out our affiliate product: AimCam. We earn a small 5–10% commission on each sale, but it’s the only affiliate product I currently endorse and feel comfortable recommending. Just note that if you have a wider face, AimCams can feel a bit snug.
For transparency, there are alternative recording setups as well, like the classic GoPro chest or head mounts and the Insta360 hat cam options.
Recommended Eye Protection: Budget Options, Hunters HD Gold, AimCam First Person Camera Glasses
Recommended Amplified Hearing Protection: Walkers Slims, Walkers Quads, GloryFire Ear Buds
Additional Accessories: Microfiber Cloths, Additional Batteries/Battery Packs, A bag separate from your handgun bag for accessories
Cartridge choice and ballistics matter, as they’re scored differently in USPSA. The sport is divided into what’s called “Major” and “Minor” power factor. The easiest way to understand this is: in Minor power factor, you score targets normally. In Major power factor, your hits are effectively tiered up by one level, Deltas count as Charlies, and Charlies count as Bravos (misses are still misses, of course).
Your power factor (PF) is calculated using this formula:
PF = (Bullet Weight in grains × Velocity in fps) / 1000
For most shooters using common 115gr or 124gr 9mm, you won’t need to worry about this right away. But it’s important to know that at any match above Level 1, you’ll be required to pass a chronograph test to confirm you meet the division’s power factor requirement. A match director can also request a power factor check at any time, even in local matches
Many of you are used to buying the cheapest 115gr 9mm without even realizing your carry ammo might actually be 124gr. That’s fine, as this approach works to get started and stay on budget. But it’s still useful to understand why shooters use different bullet weights. The heavier your bullet, the softer the recoil tends to feel. For example, 115gr ammo feels “snappier” compared to something like 147gr, which produces a softer impulse and slower slide return. That’s why many competitors fine-tune their setups based on preference: some want a fast, snappy return of their red dot; others prefer the smoother recoil for better shot-to-shot control. Editor’s note: Perceived recoil is more than just bullet weight, as it’s tied to the muzzle energy of the gun, and other elements like firearm weight, amount of reciprocating mass, and your grip. Ammo selection may be it’s own full article in the future.
That said, there’s no need to jump into using 147gr ammo right away. In fact, you can run into chronograph issues if the velocity is too low, especially depending on your barrel length, which also affects power factor.
While most people buy factory ammo, long-term hobbyists often reload their own. The obvious benefit is cost savings, especially with larger calibers. But for competitive shooting, reloading offers something just as important: consistency. When you control the powder charge, bullet weight, and primers, you reduce the chances of getting a “bad batch.” That consistency helps ensure reliability when it matters most. (That said, I still buy my ammo.)
Recommended Factory Ammo: Federal, CCI Blazer, Magtech
Recommended Ammo Accessories: Speed Reloader (Specific to your Magazine), Ammo Log, Storage Space specifically for your ammo
FIREARM : Full Size & 20+ Round Capacity
MAGAZINES: 6 to 9+ For Weather/Malfunctions
BELT : Inner/Outer System With Latch
HOLSTER : Adjustable Hanger Setup
SAFETY : Good Eye Protection & Active Hearing Protection
It is important to get familiar with both your local clubs and the official USPSA Rulebook. Practiscore is essentially the tool that every match director uses to list their matches. Nervous about getting into your first match by yourself? Read ahead for a clear view on the approach!
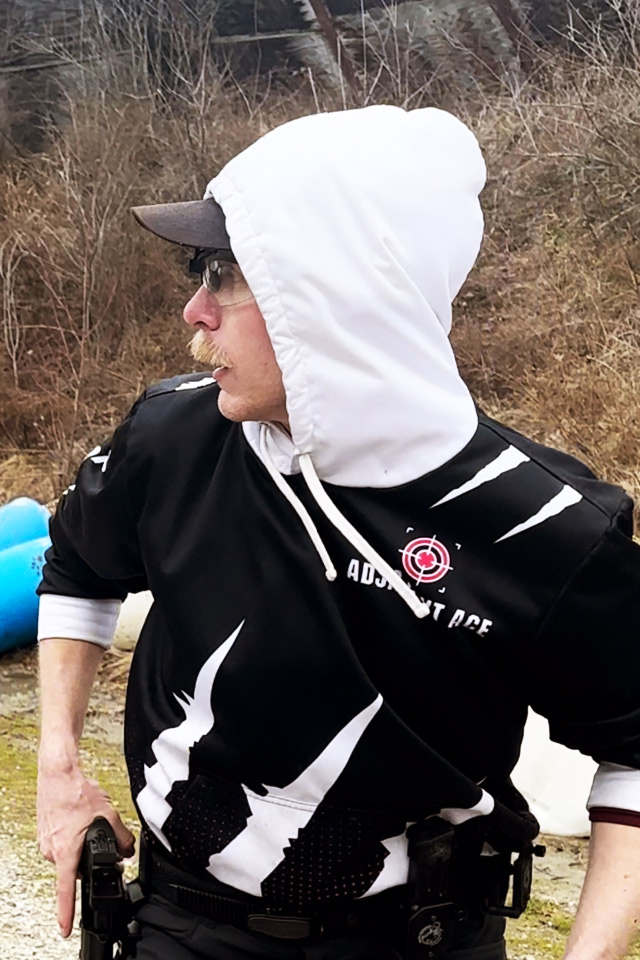
Shooting your first match might sound intimidating, but it absolutely isn’t! In fact, this will unironically be the easiest match of your life. There are zero expectations beyond safely handling your firearm and following instructions.
Do not approach your first match with the mindset of climbing the leaderboard. There’s no point in doing so. Regardless of your current skill with a firearm, learning the flow of USPSA classifiers and understanding how your local stages are built takes a few matches. Once you get that rhythm down, your scores will naturally improve.
Make sure to let the match director know it’s your first time. They’ll ensure you’re not the first to shoot on any stage. They will also walk you through the range commands before you begin. The competition community is overwhelmingly welcoming and incredibly helpful. There’s a ton of knowledge and support to help you improve right away.
Again, the most important thing is to be safe at your match. Most ranges operate under what’s called a “cold range” policy. This means your firearm should never be loaded or have a magazine inserted unless you are explicitly instructed to do so at the start of your stage. All applicable safeties must be engaged to indicate a “cold” (safe) firearm.
Your firearm may only be handled at designated safe tables, where you’re allowed to check things like your optic, holster retention, or other equipment-related aspects of the gun. Ammo is strictly prohibited at the safe table. However, you may handle ammo independently of the firearm in other areas unless otherwise noted.
Pay attention to the shooting order. The person running the scoring tablet will usually call out the next 3–4 shooters each time someone finishes a stage.
When it’s your turn, step up to the start position. The Range Safety Officer (RSO) will issue the first command:
“Make Ready.”
This is your cue to make all necessary preparations: check your optic, load your pistol, and get into position.
Once you’re still or indicate readiness, the RSO will ask:
“Are you ready?”
Unless you object, they will then say:
“Standby…”
A second or two later, you’ll hear a sharp beep from the shot timer. That’s your signal to begin the stage.
When you finish the stage, keep your firearm pointed safely downrange. The RSO will instruct:
“If finished, unload and show clear.”
Remove your magazine and clear the chamber. Next, you’ll hear:
“If clear, hammer down and holster.”
This means you should pull the trigger to decock (pointed safely downrange), then reholster your firearm.
What do you do if you hear “STOP”? At any point during your run, if you hear the word “STOP!”, freeze immediately. Keep your firearm pointed downrange and do not touch anything until the RSO gives you further instructions. There are many reasons an RSO might stop a stage. Some are safety related, others may involve equipment issues (e.g., a steel target falling prematurely). Always wait and listen for specific directions.
There’s a well-known saying in the competition community; “If you haven’t DQ’d at least once, you haven’t shot enough matches”. It’s a scary thought, but it reflects the reality that mistakes happen. The key is to stay mindful and prioritize safety above all else.
The 180 Rule is the #1 cause of disqualifications. It states that your firearm must never be pointed beyond a 180-degree line extending directly across the bay (from left to right). In simple terms, you can’t point your gun behind you, not even slightly. Most new shooters break this rule while moving backward or sideways during reloads. To avoid this, it’s smart to reduce or reposition your reloads, even if it adds a second or two to your time. It’s a small trade-off for maintaining a safe and legal run.
Good stage planning is essential to learning the proper flow of target engagement in a competitive environment. It is notable to mention that competition stages are significantly different than combat scenarios (no larping here). At the beginning of every stage, you will be given 4 minutes to assess and practice the flow of the stage. You’ll do this with everyone else in your squad, using your finger as the gun. It’s incredibly easy to squander this time, and even hinder your actual run. We want to practice at a pace that you’ll actually shoot the stage with. This means properly walking out and aiming your finger gun, with each trigger pull being consistent to how you plan on shooting the actual gun. Closer targets might receive faster splits, while your farther targets should see an increase in time between each shot.
During this planning time, you should be able to find a flow that feels almost second nature. It’s not something you should have to focus too hard on. When you start shooting for time, you’ll want there to be as little thought as possible while you’re doing things. Everything should feel automatic, from split times at different distances to moving from position to position. A good rule of thumb (though not always) is to find the fewest positions to shoot from. This can change if you have targets within comfortable range that you can shoot while moving, eliminating the need for multiple positions during transitions. But to start, you’ll likely be finding stationary spots to shoot from.
When you step up to the line to shoot, clear your mind. The best advice I’ve been given so far is to hold my breath as I’m walking up, while I squeeze every muscle in my body until I feel the pressure build up in my head. Then, I slowly release both my muscles and breath, leaving me feeling relaxed and limber. Confidence is a major factor in being successful at this sport.
It’s your first match! Don’t worry about where you end up on the leaderboard. Focus on what you felt during the match and identify where you had hiccups. Then, plan a course of action! There are plenty of amazing drills to target different areas of shooting technique. However, your training sessions should cover them all over time. Not sure where to start? Join us for our Drill of the Month challenge every month, featuring a fresh drill and author notes to guide you through what to focus on in your training!
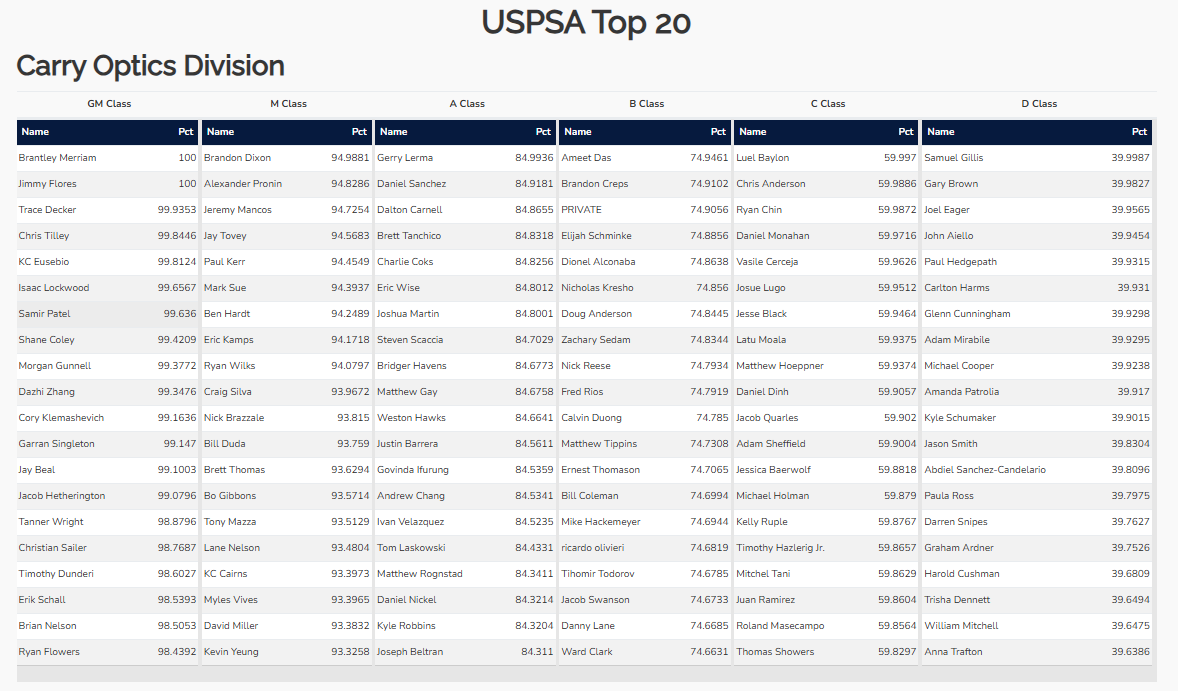
USPSA follows a standard ranking system. It sounds a bit complicated but is rather easy once you understand it. Essentially, your final score of any stage is determined by Hit Factor (Score divided by Time).
Setup any of the Official Classifiers you might see in competition and check to see where you line up using the provided USPSA calculator from your membership page. The numbers don’t lie!
As mentioned, my first recommendation is for you to start with Production or Carry Optics. However, there are 9 divisions to choose from, and it’s important to highlight the differences between each in case there’s one you might prefer! Many people shoot multiple divisions over the course of two days at larger matches, so don’t feel like you’re limited to just one. Remember, if you shoot Carry Optics and Limited Optics with the same gun, be sure to remove any additional accessories (like the flared magwell), when transitioning from Limited Optics to Carry Optics.
Strict division for bone-stock guns.
Iron sights only, no magwells, no external mods
15-round mag cap (even if your mag can hold more)
Guns must be on the approved Production list
Holsters: Must cover trigger, no race holsters
Most accessible to new competitors
The most popular division right now.
Slide-mounted red dot only (no comps).
No magwells.
Max mag length: 141.25mm, usually ~20rds in 9mm.
Gun must fit in box with magazine inserted.
Holsters: Must cover trigger, no race holster
“Run what ya brung” — the race car division.
Optics Allowed
Compensators Allowed
Flared Magwells Allowed
Max Mag Length: 170mm (max 29-30rds in 9mm).
Holsters: Race holsters Allowed
Same as Limited, but with a 10-round magazine cap.
Created for states with mag limits.
Not as popular nationally, but still active.
1911-only division.
Scored major/minor depending on caliber.
Mag cap varies: 8 rounds major (.45), 10 rounds minor (9mm).
Wheelguns.
6 (major) or 8 (minor) round limit
Speedloaders or moonclips allowed depending on subcategory.
Rifles in pistol calibers (9mm, .40, etc.).
Optics allowed, comps allowed.
Max mag length: no limit but extra magazines must be carried still per rules.
Shooting my first USPSA match completely turned my world upside down. I already had a growing interest in firearms and a range membership, which had me mag-dumping every other week at my local range. I was lucky enough to be approached by Peter Johnson, the active RSO, who introduced me to the world of competitive shooting.
Just over a year later I now see myself doing this for the rest of my life! The competitive atmosphere and environment to develop practical skills is just too enticing not to be apart of.